Unity3D: images optimization to reduce the file size of your build
If you don’t want to find yourself with a 600Mb file size (for only one level), when you build your project, then this post is for you. In this post we show you how we optimize the size of our image assets to keep the file size of our build to a manageable size.
In Funky Bob, the game scene has been intentionally designed with the camera closing in on the character (Bob), during the entire game play. This is done intentionally so that the entire scene is not visible to the player, to always maintain an element of surprise when enemies and collectibles appear into the scene. Also, this forces the player to explore the platforms’ maze to complete the level, memorizing her way around the level.
This approach however, has the disadvantage that the background art need to be made at high resolution. And it will ultimately impact the game file size. Careful optimization of the image files and compression therefore is crucial…especially for the mobile version.
Let’s consider for example the background image below for one of Funky Bob’s levels:
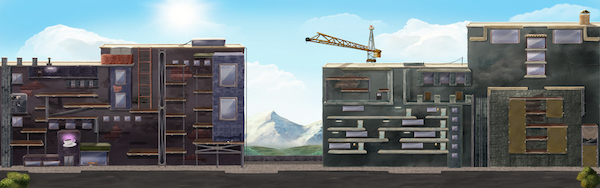
The level scene size is 16718 px x 5252 px. At a resolution of 300 dpi, the image file is 76.9 Mb. Obviously this image will not be added to the scene as one single asset, and it need to be sliced. But there are other factors to consider.
1) TransparencyFirst of all transparency. The alpha channel in the image file, contains information about the transparency of each pixel. As a consequence, images with transparent parts will occupy more space. So, the first thing to do is to turn off the transparency. If you work on a Mac, for example, you can open the image with Preview, and re-export the file disabling the alpha channel. Keep in mind that if only one pixel has transparency, the image will still store the alpha value for all the pixels in the image. This can take a lot of disk space.
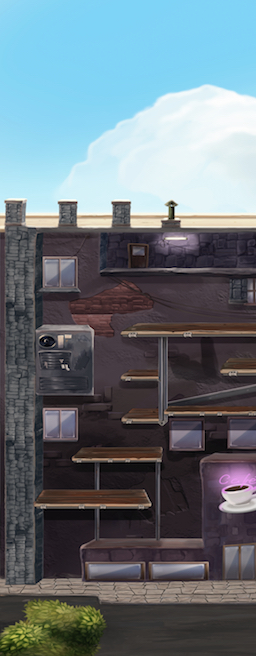
For example, let’s extract the vertical slice below, 2048 px wide. This image would take 12.5Mb at 72 dpi, with the alpha channel activated, and 10.5Mb without the alpha channel. 2MB saved!
 2) Power of 2
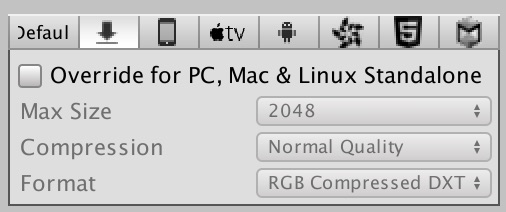
The reason why we extract vertical slices of 2048px has to do with the Unity editor. Unity sets the maximum width of images to 2048 pixels. This was done since some old devices (especially mobile) could not handle larger images. With improvements in the hardware, this problem is rapidly vanishing, but Unity still require you to override the maximum image width for each image asset in the editor inspector. This is the place were a lot of other image compression settings can be adjusted.
The most important compression that really did the trick for us, is the power-of-2 compression. Explaining how this compression algorithm works is beyond the scope of this post. The only thing we will say is that it is a very effective compression process. As the name says, the compression algorithm only requires you to distort the image width and height to a number that is power of 2.
Let see an example. The background slice above, as we said, is 2048 px x 5252 px, and takes 10.2 Mb of disk space after we removed the alpha channel. If we distort the image to 2048 px x 4096 px, the file size is already reduced to 8.4Mb. Now, when your add the file to the scene, and Unity compresses the image in the build, the image size is reduced to only ~1 Mb. Almost 10 times smaller than the original image. You can see how this will reduce the original 80 Mb background to less than 10 Mb. To complete the process, the image is now distorted since we changed arbitrarily its height. The only thing left to do is to set the Y scale in the Unity image inspector to 5252/4096 = 1.2822265625, so that the image will be restored to its original size in the game scene.
We hope this helps. Feel free to send a comment.